For a typical blogger, WordPress works wonderfully right out of the box, but as a developer, there are times when your customer needs a lot more tools to record and show a lot more information. In such a case, you have to get your hands dirty and add custom fields to a WordPress installation.
Developers may add more information to a WordPress post in a sensible way with custom fields.
Think of a blogger who is required by law to tell their readers whether a post is sponsored or an event planner who must provide information about their activities.
The blogger or event planner can get away with manually inputting that information for one or two articles or events, but they will go crazy if they have to do it for hundreds of posts or events.
Custom fields might be useful in this situation. You can collect all the necessary information by adding more fields to a post, and then you may change your theme to show the information.
Keep in mind that altering themes necessitates some coding expertise.
Table of Contents
Beginners Guide: How to add custom fields in WordPress?
1. Use the WordPress Custom Fields feature.
Custom fields are available in WordPress’s posts and pages.
By selecting the tools and options icon (the three vertical dots) in the editor’s upper right corner, you may discover this on the Post or Page to which you wish to add a custom field.

Then choose Options from the dropdown menu under More Tools and Options.

Select the Custom Fields checkbox in the Advanced Panels section.

Select the Custom Fields checkbox in the Advanced Panels section.

2. Using Advanced Custom Fields
A developer may add metadata to posts, pages, and any other sort of WordPress content that the built-in custom fields in WordPress cannot manage using the simple yet effective Advanced Custom Fields plugin.
It has a wealth of features and thorough documentation, making it simple to incorporate any crazy concept into your content.

Installing and setting up Advanced Custom Fields in your WordPress admin panel is the first step.
Click Add New in the Plugins section, then look for Advanced Custom Fields.
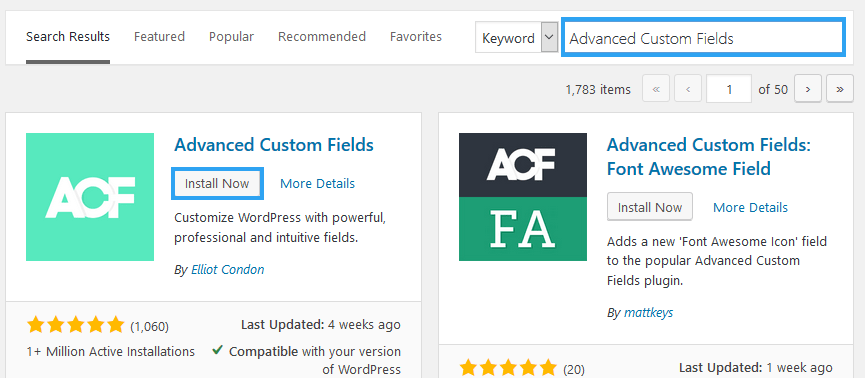
In the WordPress admin panel, you must first install and set up Advanced Custom Fields.
Search for Advanced Custom Fields by clicking Add New under Plugins.


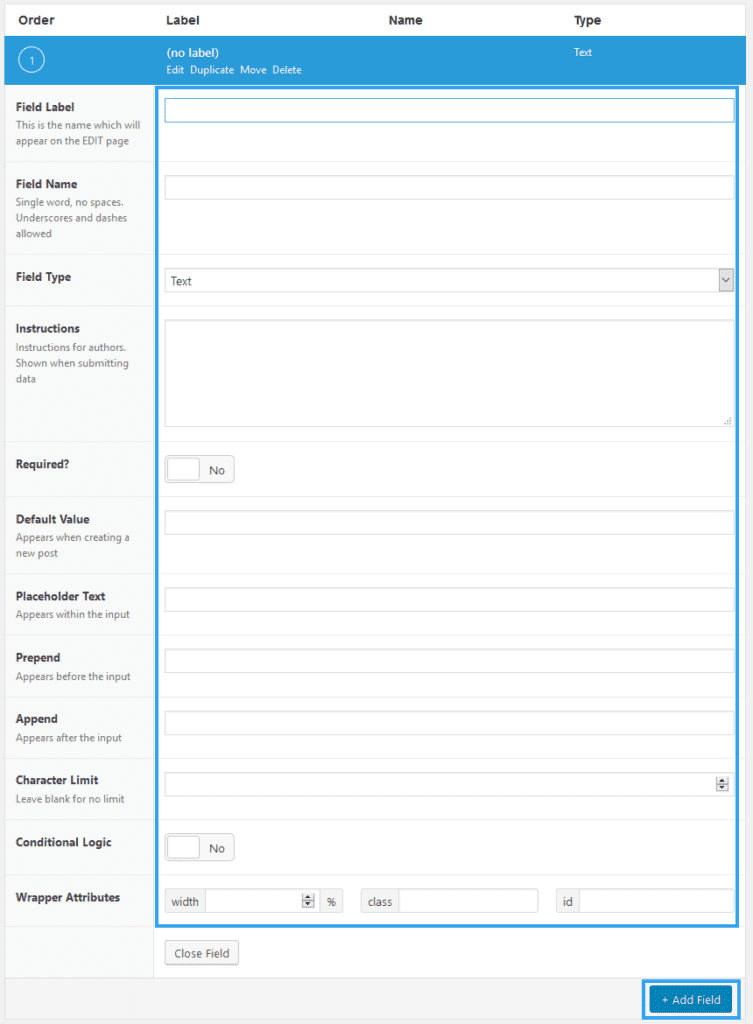
If you need to add a new field to your group, fill out the appropriate forms with the necessary information and click Add field. For instance, you could need a title field, picture field, photographer field, and more if you’re building a custom field for a photo gallery.
2.Add location.
Make the rules that will define which screens the custom fields are put using the location field.
3.Settings: The custom fields group’s positioning and appearance are under your control from this point.
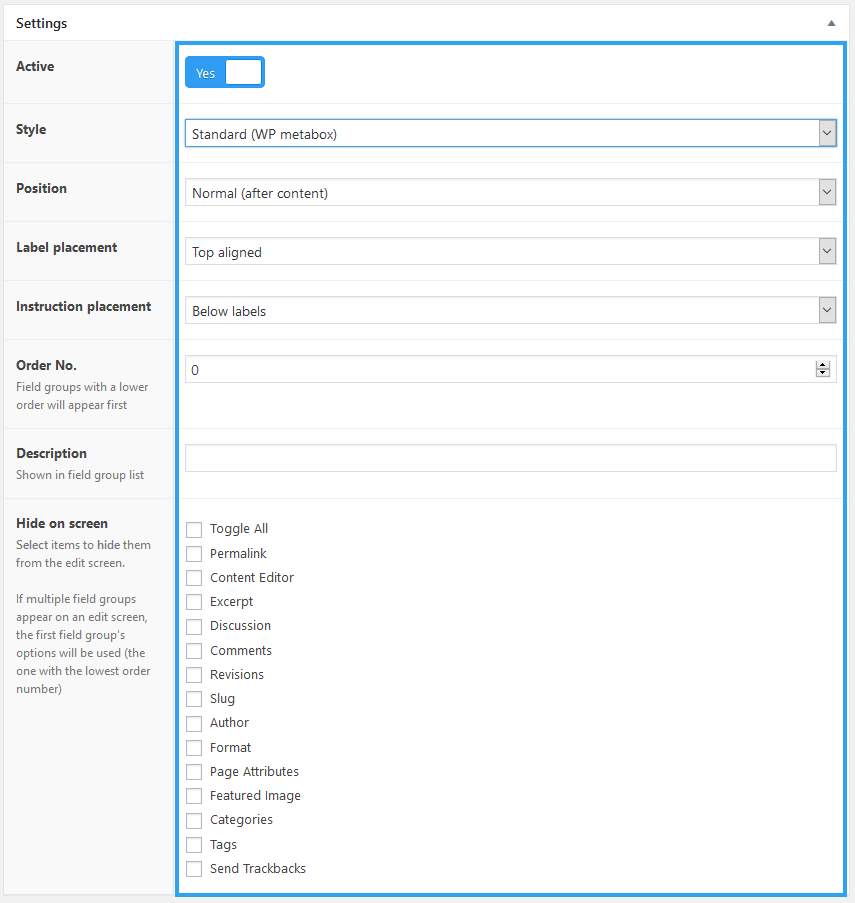
That is how custom fields are added in WordPress.
Now that your custom fields have been set to display in, you may access your post, page, or any other content type.
4.Go to the postYou should be able to view the advanced custom field at the bottom of the editor.
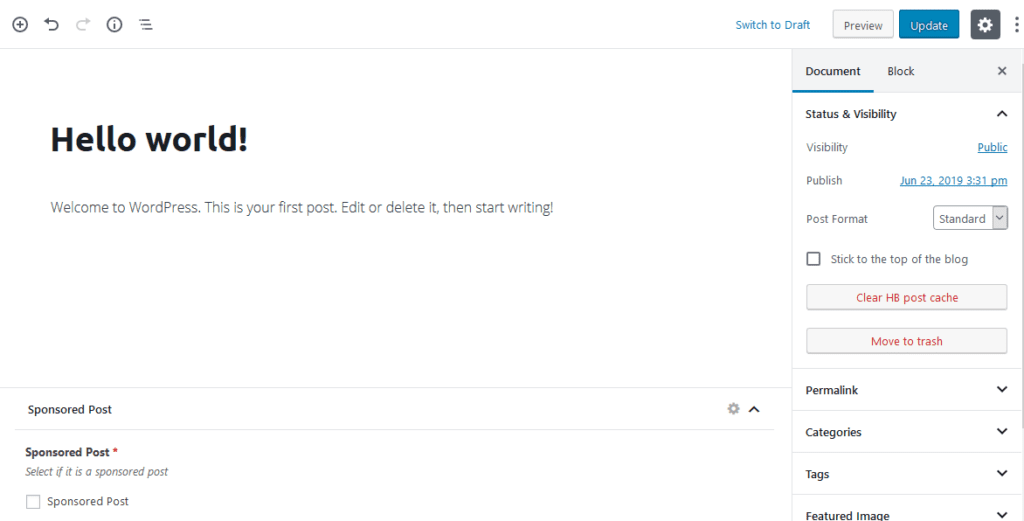
5.Output your data to a page.
It’s time to get filthy and input the data that the advanced custom fields have recorded into your theme.
The next link will show you how to export your data to a theme with sophisticated custom fields. You may also use this link to find out how to change a theme such that it outputs data using the built-in WordPress Custom Fields.
Recommendations before you modify the theme
Use a kid-friendly theme.
Making any changes to a child theme is recommended. The current pages are frequently replaced by theme updates. Any modifications you make to such pages are lost once an update occurs.
Make a website backup.
I would presume that, as a developer, you are aware of the value of making a backup of your files before making changes to them.
This is the ideal time to introduce you to our flagship product, the WPvivid Backup and Restore plugin, if you don’t already know who we are. We observe website proprietors adding it every other day for a straightforward explanation. Utilisation is simple. It has several features. It just works. It is also free.
Include it in your toolbox.
Conclusion
I hope this post has given you a basic understanding of WordPress Custom Fields and the Advanced Custom Fields plugin.
The Meta Box plugin, which enables you to build custom meta boxes and custom fields, is another plugin you may use to handle custom fields.
You may design unique meta boxes and fields across WordPress with Piklist.
You may start any customer project with these tools without worrying about getting lost in the code.
In the space below, you may express your opinions and views about this topic.


