Table of Contents
You need a professional email address for your business, and here’s how to make that happen with cPanel webmail.
Putting your best foot forward as both an individual and a business can start with something as simple as having a professional-looking email address. For a bit of context- think back to the email address you had in high school or college. How many of you had a favorite movie or band or sports team in your email address? Now imagine trying to submit a resumé or use that same address as your small business contact. Are you embarrassed to share it? Be embarrassed no longer.
cPanel offers the ability to quickly create custom-branded email addresses. You can also use your cPanel server as a mail server. Read on to learn more about cPanel Webmail and how to login to check your email accounts’ inboxes!
Using cPanel’s Manage Email Accounts to Create Your Own Branded Email

If you’re not already familiar, cPanel has a tool called Manage Email Accounts that gives users the ability to create email addresses for the domain they are hosting. Under the EMAIL header inside cPanel, there are several tools available for creating and managing your email accounts.
Clicking on the “Email Accounts” icon will lead you to the section where you can manage existing or create new email accounts. To get started and create your email account, click on the +CREATE button.
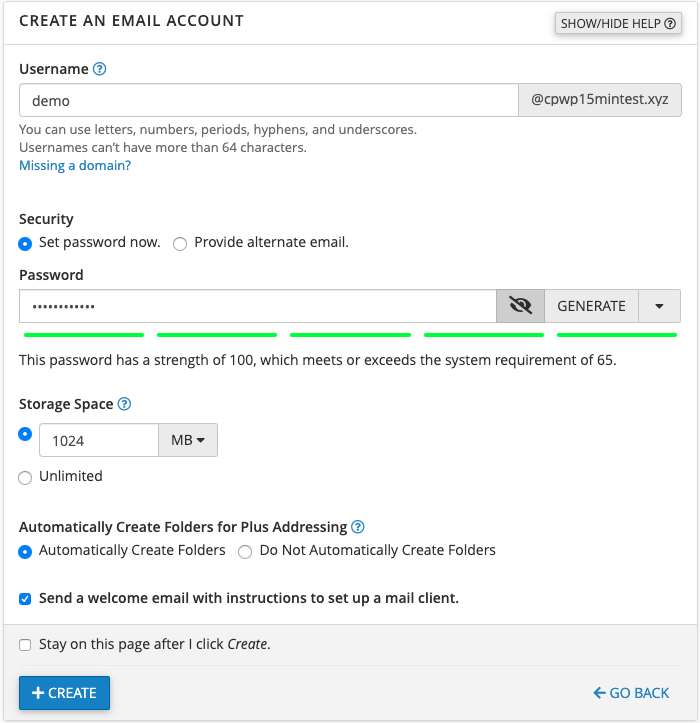
The process of setting up an email account using your domain is straightforward.
- Enter in your desired username (a department or person’s name, for example)
- Set a password for that email address. If you want to ensure the email account’s password exceeds the system’s minimum security score requirement of 65, click the GENERATE key to generate a strong password. Make sure you copy this password into your password storage software of choice.
- Select the amount of storage space (disk space) you want to allot to this email account.
- Choose whether you want to create folders for plus addressing automatically.
- Toggle the “Send a Welcome Email” option. A Welcome Email is an informative message to the email account you create, including instructions on how to set up a mail client (such as Thunderbird or Outlook or a mobile device) as well as the password for the email account.
- If you want to create a new email account after this one, click the “Stay on this page” option.
- Click +CREATE, and you have a brand new email account!
How to Access Your cPanel Webmail
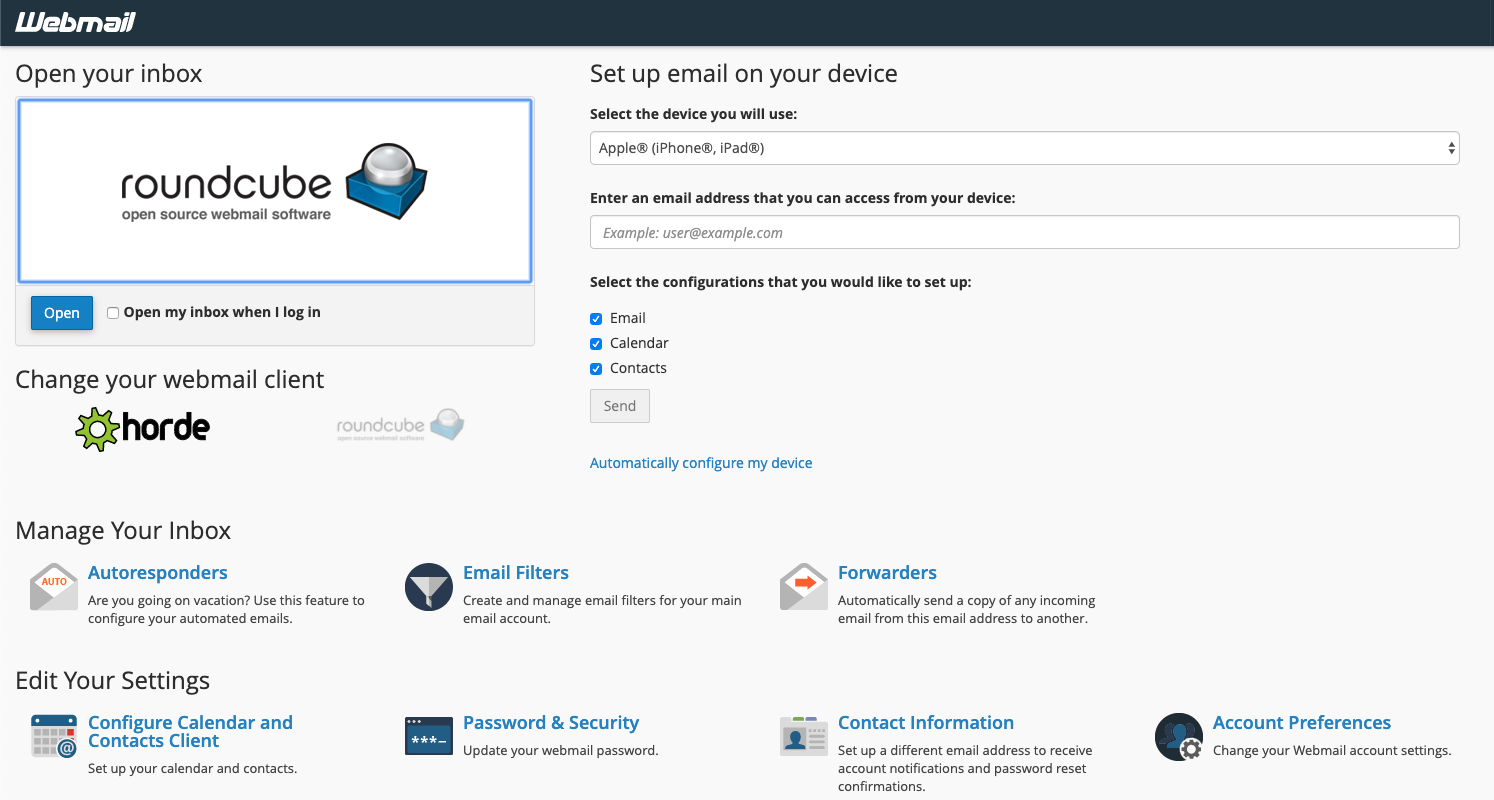
Now that you have your personalized domain email accounts created, you’ll need a way to check those inboxes! Packaged alongside cPanel & WHM is Webmail.
What is Webmail, you ask? Webmail is a login portal that provides a large number of email utilities such as Email Deliverability tools, Spam Filters, and BoxTrapper and more.
How do you access your cPanel email using Webmail? There are two different methods:

In the Email Accounts section of cPanel, you’ll see a list of email accounts you’ve created, their restrictions, the amount of storage each email account is using, and a handful of tools. The leftmost box, “CHECK EMAIL,” is a direct link to the Webmail Portal. Click that button next to the email account you want to access Webmail. Simple as that!
But what if you don’t want to log into cPanel every time you want to check email, or can’t access cPanel? There’s a login portal for Webmail that’s accessible from your browser! Instead of using the traditional 2083 (cPanel) or 2087 (WHM) ports, you can use the 2096 port to access Webmail. Just follow the same format using your domain in your browser of choice:
5 Reasons Why Having a Branded Email Account is Important
If you’ll think back to the beginning of this article (hint: having [email protected] as your resumé email), I mentioned that having a professional-looking email account is important. Here’s just a few reasons why you should make the effort to set up your domain-based email using cPanel webmail:
- Professionalism Put your best foot forward with an email address that matches your business or organization. You no longer need to (or should, for that matter) send calendar invites, business appointments, or documents using your high school heavy-metal phase email account.
- Branding Having a contact email account that promotes your brand name is a cheap and straightforward way to get the name of your company organization out there.
- Build Trust When a potential customer or client receives an email from your branded email account, you’re providing a sense of security and credibility, whereas receiving an email from [email protected] may not exactly inspire trust when conducting business.
- “Departmentalize” With domain-branded email, you can create department email accounts such as support@, info@, support@, marketing@, and more. By creating emails for different aspects of your business (even tiny businesses), creates a professional and established image that will cause people to take you seriously.
- Cost-Effective Creating an email address in cPanel (limits may depend on your hosting provider) is simple and costs nothing to you other than resources.
We’re only scratching the surface of getting started with your domain-branded email account. There’s a slew of excellent productivity tools your budding company or brand can use inside of Webmail. Keep your eyes out for future blog posts explaining how to use the Calendar and Contacts tools, for example.
cPanel Webmail
cPanel’s webmail feature is an integrated part of the cPanel hosting platform, allowing users to manage their email accounts directly from a web browser. This convenience ensures that users can access their emails from anywhere in the world, provided they have an internet connection. Here, we’ll explore how cPanel webmail works, how to access it, and some tips for effectively managing your email through this platform.
How cPanel Webmail Works
cPanel webmail interfaces with the email service running on your web hosting server, providing a web-based client through which you can send and receive emails. It supports various webmail clients, such as Roundcube, Horde, and SquirrelMail, giving users a choice in their email interface. These clients offer different functionalities to suit diverse user needs, from basic email reading to more advanced calendar and task management features.
Accessing cPanel Webmail
- Direct Access via URL: The most straightforward way to access your cPanel webmail is by using a URL in your web browser. Typically, this URL will be in the format of
http://yourdomain.com/webmailorhttp://webmail.yourdomain.com. Replaceyourdomain.comwith your actual domain name. Secure access can usually be achieved by replacinghttpwithhttps. - Access through cPanel: You can also access webmail through the cPanel dashboard of your hosting account. After logging into cPanel, look for the ‘Email’ section and click on the ‘Webmail’ icon. This action will redirect you to the webmail selection screen, where you can choose the webmail application you wish to use.
Setting Up an Email Account
Before accessing webmail, you must set up an email account in cPanel if you haven’t already. Here’s a quick guide:
- Log into your cPanel account and navigate to the ‘Email’ section.
- Click on ‘Email Accounts.’
- Click on ‘Create’ and fill in the necessary details, such as email address, domain, password, and mailbox quota.
- Click ‘Create’ to finalize the setup of your new email account.
Tips for Managing Your Email in cPanel Webmail
- Choose the Right Client: Experiment with the different webmail clients available to you (Horde, Roundcube, SquirrelMail) to find the one that best fits your needs.
- Organize Your Emails: Utilize folders and tags to keep your inbox organized. Most webmail clients support dragging and dropping emails into folders.
- Use Filters: Set up email filters to automatically sort incoming mail into specific folders, mark them as read, or even delete spam.
- Update Your Password Regularly: For security, regularly update your email account passwords through the cPanel > Email Accounts section.
- Configure Email Forwarding: If you use multiple email addresses, consider setting up email forwarding to centralize your emails to a single account, which can be managed via cPanel.
Conclusion
cPanel’s webmail feature is a powerful tool for managing your emails directly through your web browser, eliminating the need for a separate email client. By understanding how to access and use this feature, along with setting up and managing your email accounts efficiently, you can streamline your email management and improve your productivity. Always ensure to use secure connections and maintain good password hygiene to protect your email communications.


