PHP performance is an enduring issue for web hosts. PHP is the most widely used server programming language on the web by a big margin. The most popular content management systems and ecommerce applications are written in PHP, including WordPress®, Joomla, Drupal, Magento®, and dozens more.
The ultra-fast PHP-FPM accelerates PHP execution on busy web servers, making it a valuable tool in the fight against slow sites and resource-constrained servers.
This article takes a deep dive into how PHP-FPM works and explains how to deploy and configure it with cPanel & WHM.
Table of Contents
What is PHP-FPM?
PHP-FPM is an alternative PHP implementation that makes busy web applications faster while helping system administrators to control resource consumption on their server.
A PHP implementation, also known as the runtime, interprets and executes code. Traditional runtimes such as Apache’s mod_PHP do their work within the web server. That approach has advantages, but each connection consumes a chunk of the server’s resources for as long as it lasts. If there are too many concurrent connections, the server may run out of resources like memory altogether, impacting the performance of every site it hosts.
PHP-FPM does things differently: it operates outside of the web server and uses a pool of worker processes to execute code. The workers are ready and waiting when a request comes in, and you can control how many workers are in the pool so they can’t multiply until they consume all the server’s RAM and processor time.
It works like this:

- Apache sends code to PHP-FPM over a high-speed binary interface called FastCGI.
- A supervisor process chooses a worker process from the pool and gives it the code.
- The worker executes the code, and the result is sent back to Apache, which sends it to the web browser.
- Once the worker is done, it returns to the pool to await another chunk of code to execute.
If there are too many concurrent connections, some might have to wait for a free worker, but they will never consume all of the server’s resources. On a busy web server, worker pools are faster and more efficient than other strategies.
Getting Started with PHP-FPM in CentOS and EasyApache
It is straightforward to activate and configure PHP-FPM in cPanel & WHM. You can choose which domains use it and set configuration variables that influence its behavior.
The first step is to turn it on in the System PHP-FPM settings in WHM’s MutliPHP Manager.

When you click Turn On, WHM makes PHP-FPM available, but it doesn’t activate it for all domains automatically. You can force all accounts on the server to use PHP-FPM by clicking Convert All Accounts to PHP-FPM.

Alternatively, you can activate PHP-FPM for individual domains in the table at the bottom of this page. To turn it on for several domains at once, select them in the table and choose On in the drop-down menu.

Configuring PHP-FPM in cPanel
Once you have activated PHP-FPM, you can configure both the system defaults and the settings for individual domains in MultiPHP Manager.
Click the System PHP-FPM Configuration tab.

In this section, there are three pool settings you can change. These are the default values that are applied to domain pools.
- Max Requests: The number of requests each worker process should execute before it restarts itself. This setting is useful for working around memory leaks. The default of 20 is acceptable for most web hosting scenarios, but you may want to increase it to between 40 and 60 on servers with heavy traffic.
- Process Idle Timeout: How long an idle worker process will wait before shutting down. Idle processes consume resources, so we don’t want too many hanging around, but we don’t want to kill them too soon because it takes a while to start new ones. The default of 10 (seconds) may be too low for a busy server.
- Max Children: The maximum number of worker processes in each pool. The default is 5.
Many factors affect the optimal values for these settings, including the code your server runs and the amount of RAM it has. We wrote PHP-FPM Performance Tuning Basics to help you decide on the correct values for your server.

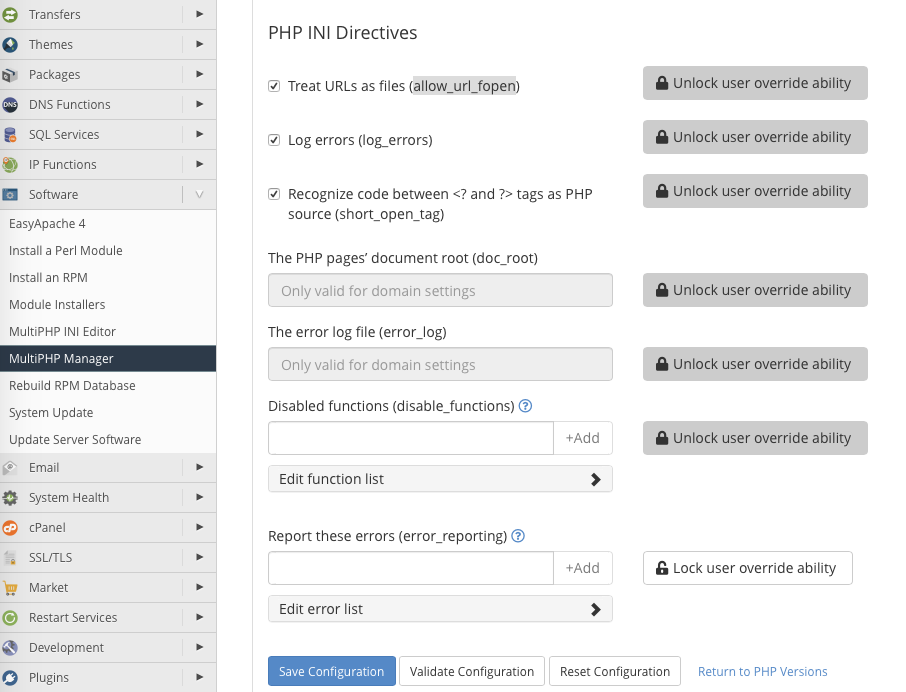
Underneath the pool options are PHP INI directives. We surface several of the most useful in the interface, and you can find more information about them in PHP’s Runtime Configuration documentation. We’ll show you how to add other directives in the next section.
In addition to system-wide configuration, you can also configure individual domains in the WHM interface.

In the table at the bottom of MutliPHP Manager, click Edit PHP-FPM at the end of the domain’s row. The options that appear are identical to those in the system-wide configuration interface.

How the cPanel PHP-FPM Module Works
Although the WHM interface contains the most useful configuration options, there are many more in the documentation. To add or modify them, you will need to edit configuration files on the server’s command line or in the cPanel & WHM File Manager.
The two most important system-wide configuration files are:
- /var/cpanel/ApachePHPFPM/system.yaml
- /var/cpanel/ApachePHPFPM/system_pool_defaults.yaml
WHM doesn’t create these files because the system doesn’t need them, but you can create them yourself and add directives to override the defaults.
touch /var/cpanel/ApachePHPFPM/system.yaml
touch /var/cpanel/ApachePHPFPM/system_pool_defaults.yaml
You may also have to create the directory with:
mkdir -p /var/cpanel/ApachePHPFPM/In these files, enter only directives that differ from and override the system directives. For example, if you wanted to change the emergency_restart_threshold directive from the default of 0, the system_pool_defaults.yaml file would look like this:

The three dashes at the top of the file (———) are part of the YAML markup language and must be present. The configuration file won’t work without them.
In the PHP documentation, you will find directives formatted with periods (.) and other symbols; syslog.facility, for example. When adding directives to configuration files, these symbols must be replaced with an underscore (_). For example, instead of syslog.facility, use syslog_facility.
You can learn more about configuring the cPanel PHP-FPM module in Configuration Values of PHP-FPM and PHP-FPM Code and FileSystem Layout for EasyApache 4.
Creating User Pools in PHP-FPM
Finally, we’ll look at manually creating and configuring domain-specific user pools in PHP-FPM. These are the worker pools used by sites hosted on your server’s domains.
The PHP-FPM module creates a worker pool for a domain if it finds a configuration file in:
/var/cpanel/userdata/[user]/[domain].php_fpm.yamlReplace [user] and [domain] with the relevant values for your server. You can create this file or activate PHP-FPM for a domain in WHM and it will be created automatically.

At a minimum, the file must contain the following information:
As with the system files, you can add directives to configure the user pools. After creating or editing the .yaml file, run the following command:
/scripts/php_fpm_config --rebuild
The script adds directives to Apache’s config file and restarts PHP-FPM, after which the new pool will be up and running. You can find more information about creating user pools in PHP-FPM User Pools.
Easy PHP-FPM Configuration with cPanel & WHM
PHP-FPM gives busy web servers a huge performance boost. Just as important, it helps web hosts to make the most of limited server resources, reducing the cost of providing an excellent hosting experience to clients and their users.
With cPanel & WHM, PHP-FPM can be activated in seconds and configured in an intuitive interface. If you need to dig deeper into PHP directives, our module makes building custom configurations for the runtime and worker pools straightforward.
As always, if you have any feedback or comments, please let us know. We are here to help in the best ways we can. You’ll find us on Discord, the cPanel forums, and Reddit.


